Hardened mold components are where a wrong process choice becomes expensive. In a soft or pre-hardened state, tooling and stock allowance can forgive mistakes. In a hardened state, the same mistakes quickly turn into:
- tool chipping and unstable surface quality;
- geometry drift (local overheating, stress release, warping, grinding burn);
- extra bench work — or even a re-make of an insert.
That’s why the question “hard milling, EDM, or grinding?” should be answered with a simple, practical logic: geometry → surface requirement → tolerances → distortion risk → lead time.
Below is a shop-floor oriented guide to selecting hard milling, EDM, or grinding (and how to combine them) to reach accuracy without chipping and without unpleasant geometry surprises.
What “hardened mold components” usually means
After heat treatment, mold shops typically machine or finish:
- forming core/cavity inserts;
- slides, lifters, wedges, and guide elements;
- shut-off areas, parting line surfaces, sealing faces;
- thin “knife-edge” features, ribs, sharp transitions;
- precision fits for bushes, guide pins, columns, and locating features.
The key point is that hardness makes parts less forgiving: errors in heat and load management show up faster as chips, micro-cracks, or size drift.
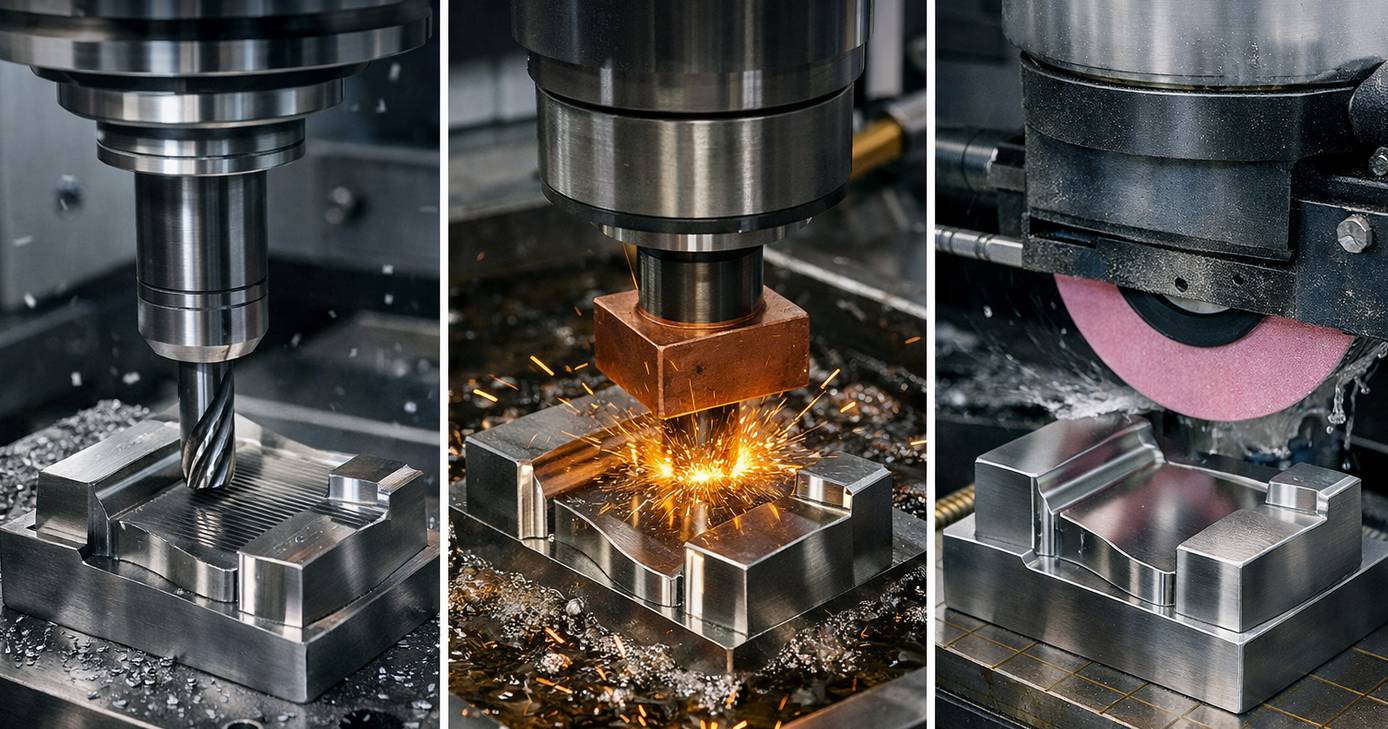
The three options — in one paragraph each
Hard milling (HSM / hard machining)
Best at: productive 3D shaping with controllable tool marks, especially on freeform surfaces. Risk: sensitive to vibration, long tool overhang, and load spikes; chipping is the common failure mode.
EDM (wire EDM and sinker EDM)
Best at: geometry that milling cannot do reliably — deep ribs, narrow slots, and sharp internal corners. EDM is largely independent of hardness. Trade-off: EDM leaves a recast/EDM layer; critical surfaces often need polishing or light grinding. Incorrect settings can affect the surface layer.
Grinding (surface / cylindrical / profile grinding)
Best at: ultimate accuracy for flatness, parallelism, size, and low roughness on accessible surfaces. Risk: grinding burn and thermal damage if wheel selection, dressing, or coolant are wrong; geometry is limited by wheel access.
A practical 5-step selection algorithm
Step 1. Identify the geometry type
Ask: is it a freeform 3D surface, a deep narrow feature, or a precision plane/cylinder?
- Freeform 3D surfaces (domes, blends, smooth radii) → often hard milling.
- Deep ribs, narrow slots, sharp internal corners → often EDM.
- Parting line, shut-off, precision seats, guide fits → often grinding.
Step 2. Define the surface requirement
Is it a functional surface, or cosmetic (polish/texture)?
- If you want minimal bench work, plan a stable finishing route: controlled scallop hard milling + local polishing, or grinding for flats.
- If polishing/texture is planned anyway, aim for uniform tool marks (no chatter “waves”).
Step 3. Clarify what actually holds the tolerance
In mold making, certain areas are typically tolerance drivers:
- shut-off and parting line surfaces;
- insert fits;
- reference holes and guide features;
- mating surfaces where parallelism/coaxiality matters.
If the requirement is micron-level flatness/roundness, grinding is often the most reliable finishing step.
Step 4. Estimate distortion and “geometry drift” risk
The biggest factor is how much stock you remove after hardening:
- removing a lot of material after hardening increases warpage risk;
- thin/asymmetric parts warp more easily;
- high internal stress (from roughing or improper heat treatment) increases drift risk.
Conclusion: if drift risk is high, keep post-hardening stock small and use controlled finishing on datums (often grinding) plus localized EDM/milling on form features.
Step 5. Compare lead time by the full process chain
Do not compare “machine minutes” only. Compare the full route:
- machining → heat treatment → finishing → polishing/bench work → inspection.
In many cases EDM is slower per hour, but faster for the project because it avoids tool breakage risk and reduces manual correction.
When hard milling is the best choice
Hard milling is a strong option when:
- the main shape is 3D and you need predictable marks before polishing;
- there are no extremely deep/narrow features and no true sharp internal corners;
- rigid fixturing and minimal tool overhang are possible.
How to avoid chipping in hard milling
Practical rules that reduce tool failures:
- minimize overhang (use step tools instead of one long tool);
- use constant engagement strategies (adaptive/dynamic, trochoidal);
- avoid aggressive corner entry/exit (smooth linking moves, controlled ramps);
- choose tools with corner radius and coatings suitable for hardened steels;
- keep finishing cuts for a “fresh” tool — wear accelerates chatter and chipping.
Where hard milling often loses
- sharp internal corners (requires tiny tools and long reach);
- deep thin ribs and narrow slots;
- datums that require extreme flatness/parallelism (grinding is usually safer).
When EDM is the right solution
EDM is often the best choice when:
- the part is already hardened and geometry is difficult;
- you need sharp internal corners, thin ribs, knife edges, deep pockets;
- milling would require very small diameter tools with high chipping risk;
- repeatability in narrow features is critical.
Wire EDM — typical use cases
- contour cutting of punches/dies and precision profiles;
- parts where perimeter accuracy is a key requirement.
Sinker EDM — typical use cases
- deep cavities, ribs, and features unreachable by milling;
- producing sharp transitions and small radii.
Note: EDM often benefits from planned start holes and proper flushing. This is best considered early in the process route.
How to avoid surface layer issues after EDM
To keep the surface reliable:
- plan finishing EDM passes for critical areas;
- remove the EDM/recast layer on shut-off and cosmetic surfaces (polishing or light grinding);
- leave the right allowance — EDM defines geometry well, but surface finishing often defines tool life.
When grinding is the best finishing step
Grinding wins when you need:
- flatness and parallelism on parting line/shut-off surfaces;
- precision seats, guide fits, and reference datums;
- low roughness on accessible planes/cylinders.
How to avoid grinding burn and drift
Most grinding problems come from heat. Practical countermeasures:
- correct wheel selection and regular dressing;
- sufficient coolant and stable parameters;
- staged stock removal instead of heavy single passes;
- intermediate inspection on thin or sensitive parts.
The most common winning route: a combined process chain
In real mold manufacturing, the best result is usually a combination:
- rough machining in soft / pre-hardened state (leave allowances);
- heat treatment (as required by the design);
- finish critical datums (often grinding);
- machine forming geometry by hard milling and/or EDM depending on features;
- polishing/texture and inspection.
This reduces geometry drift risk because most stock removal happens before hardening, and post-hardening steps become controlled finishing operations.
Typical reasons for chipping and geometry drift — and how to prevent them
1) Too much stock after hardening Move bulk removal to the soft stage; keep post-hardening allowances small.
2) Long tool overhang + weak fixturing Shorten reach, improve support, use intermediate tooling.
3) Wrong toolpath strategy Use constant engagement and smooth linking; avoid load spikes.
4) Surface overheating (milling/grinding/EDM) Control heat with correct parameters and finishing passes; remove damaged surface layer where needed.
5) No intermediate inspection Check datums and key sizes after heat treatment and after finishing — it is cheaper than fixing issues during assembly.
Promservice approach: process selection based on the job, not habit
For mold making and mold repair, we choose machining routes that deliver:
- accurate critical datums (grinding + inspection);
- stable 3D surfaces (hard milling with HSM strategies);
- complex zones and sharp corners (EDM: wire and sinker);
- predictable finishing with minimal bench work (polishing and fitting).
Need hardened mold part machining or a full mold project?
Send your 3D model/drawing, material condition, and surface/tolerance requirements (shut-off zones, polish/texture level). We will propose a practical route (hard milling / EDM / grinding or a combination) and manufacture parts to avoid chipping and geometry drift.